MOBILETrak User Guides
MOBILETrak WMS ONLINE USER GUIDE
Quick Navigation
INTRODUCTION
MOBILETrak Warehouse Management System from Integrity Data Solutions, Inc. is built to help manage the incoming and outgoing material inventory of your warehouse and organization. It is completely integrated with several ERP vendors including NISC, SEDC, Daffron, and PCS.
MOBILETrak WMS uses custom built web-service integration to communicate with ERP’s in real-time to the MOBILETrak Client over the internet. The connection is made either over a wifi or cellular connection so the application can be used anywhere you have a connection to the internet and the MOBILETrak Cloud. So this could be in the warehouse, in the field or anywhere your are connected.
Although the application uses BARCODING as the primary form of data collection, the true power of the application is working with your material and material inventory transactions AT THE POINT OF ACTIVITY giving your staff immediate visibility to the movement of material inventory as transaction occur.
This user guide makes the following assumptions:
The device (client) has a stable connection to the internet
Customer has set up and mapped the MOBILETrak Barcode Users in the ERP
This user guide will guide you through the general functions of MOBILETrak but will not provide support with the ERP interface.
MOBILEtrak is an internet or cloud based solution. It can run on any device that has an HTML5 Browser and has a connection to the internet. These devices can be;
iPhone
iPad
Android
PC
MacBook
Surface Tablet
Rugged Tablet
And many more....
On each of these devices (clients), the connection to the MOBILETrak WMS Application is easily made. For the sake of this user guide, we will focus on using a Safari Browser as the client.
SETTING UP NEW DEVICES
MOBILETrak Cloud is designed to be a cross-platform application and run on many different devices. Below is some simple instructions on setting up and launching MOBILETrak for the first time on several different device platforms:
iOS (iPhone, iPad)
First step is to make sure your iOS Device is properly connected to an internet connection either via wifi or cellular connection, Once this is confirmed, you can begin the initial setup for your device. MOBILETrak is a BROWSER based solution so you can launch any browser installed on your iOS Device. This could be any of the following:
Launch any of the above browsers and enter the following URL:
www.app.mobiletrakwms.com
MOBILETRAK is a cloud application that runs on the internet. Each customer is provided by ID Solutions, Inc. a unique API or LICENSE KEY. This is a secure license that is unique to each organization.
Once you have received your unique API LICENSE KEY, you can use any HTML 5 Browser. For the purpose of this document, we will be using a Safari Based Browser, however the information will suffice for most browsers.
CONNECT TO MOBILETrak WMS URL
From the browser window, enter the following URL
www.app.mobiletrakwms.com
The initial (new customer connection) screen will appear and require the API LICENSE KEY to be entered
LAUNCH APPLICATION
Type, Scan, or Paste
your organization’s MOBILETrak API license Key, making sure to include all characters.
Once the API LICENSE KEY has been entered, click on SAVE SETTINGS! This will permanently save (or until it is cleared and re-saved) on the client. After the API has been saved, MOBILETrak will navigate to the following Client Log-In Screen
MOBILETrak WMS LOG-IN
MOBILETrak WMS uses the secure external integrated web-services connection to communicate the the ERP system. The initial connection uses the secure ERP user credentials that have been set-up and mapped in the ERP to login to MOBILETrak.
This document assumes that the MOBILETrak user mapping has been completed. If this has not been complete, STOP and contact your ERP integration support representative.
The initial MOBILETrak Screen is the LOG-IN Screen.
Login Screen
You will now see the current MOBILETrak Version, your Organization’s name and your ERP platform.
A valid connection can be confirmed by locating the LOCATION field on the login screen. If the location field is populated, then MOBILETrak has successfully connected to the ERP web services. If the LOCATION field is empty, click on the WRENCH icon in the lower right hand corner and re-enter the API.
If after the API has been re-entered and confirmed, you do not see a location available, please contact your ID Solutions, Inc. representative or visit the IDS Online Support Helpdesk
MAIN MENU NAVIGATION
Depending on application user interface client, the MOBILETrak Main Menu may have a few different display's. If the client is a small screen device like an iPhone or Rugged Mobile Computer, the display size and real-estate is smaller than that of a larger display such as a Desktop Computer, iPad or Tablet.
Below is an example of each type of User Interface by device type.
Quick Navigation
The quick navigation menu button allows the user to expose the Quick Navigation Menu. The quick navigation menu allows for module or transaction hopping or jumping from transactions immediately WITHOUT returning to the home page.
WORK ORDERS
The Work Orders Module is designed to allow the user to query the ERP and select an open and VALID work order that has been staked by the engineering unit. Users can use the Work Orders Module to search and validate open Work Orders and view the following :
Work Order Number
Work Order Description
Default Expense GL Account
Current List of Items, location, and required staked quantity
The work order module allows the user to expense material items from the work order pick list in a "Directed Pick" method, add material Items to the Work Order, and submit changes on the Work Order to the ERP Real-Time.
In both the small device UI and large device UI, MOBILETrak prompts the user to either scan or enter the work order number OR, Click on an existing/pending work order (as displayed in the Pending Work Orders area.
"PENDING" work orders are Work Orders that have been worked on but NOT submitted to the ERP.
RECEIVING
This module looks and acts a lot like the Work Order module. Instead of a list of material to issue to a crew, we are getting a list of materials to put on the shelf from a vendor.
Receiving Landing Screen
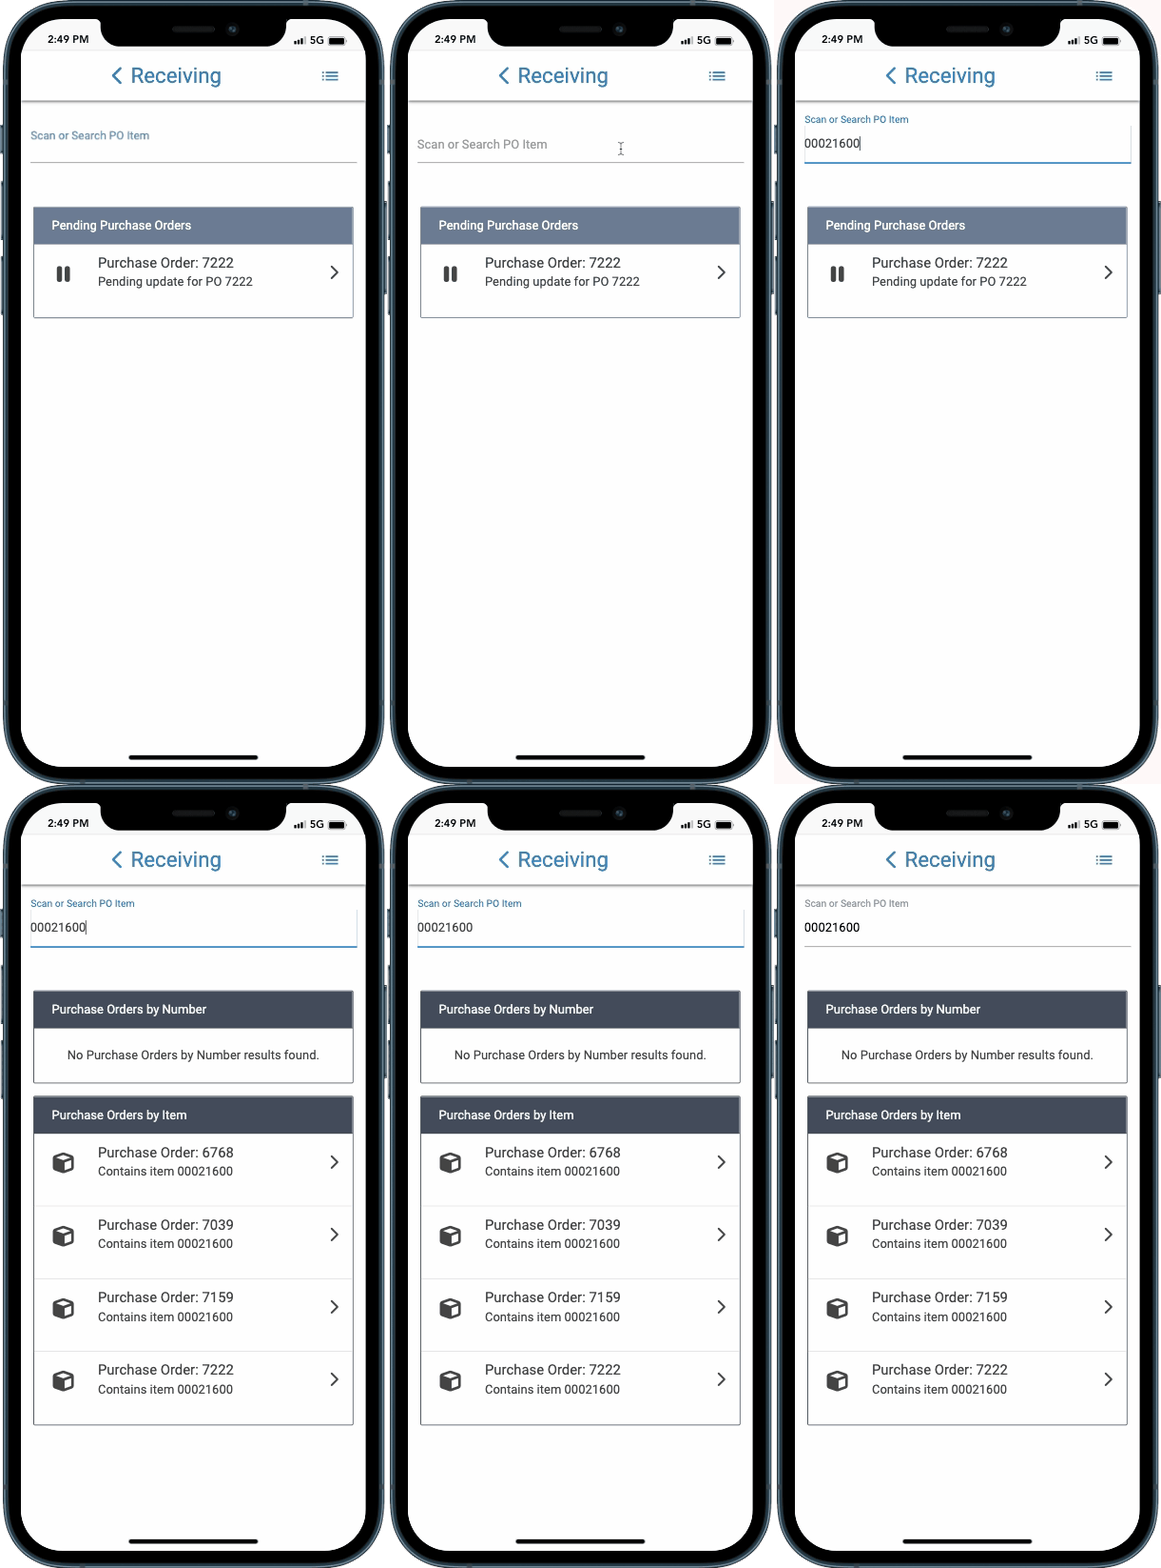
On this screen, you will see any pending PO’s as well as a search field to find a PO. There are two methods of finding a PO…
Search: PO By Item
You can also type or scan in an item’s part number and MOBILETrak will display all PO’s that contain that item.
Item Detail
Clicking into an item on the PO will move you over to a new screen. This Item Detail screen will display all of this part’s relevant information that’s being pulled from your ERP in real-time.
This is also the screen where you will be submitting counts of received quantities.
Receiving the Material
To receive a quantity of this material, simply tap into the current quantity field and type in the quantity.
You will then tap the Update Item button to save the counted quantity and affect your PO’s list of items. These counts are saved in MOBILETrak and are not sent to your ERP until you tap the Apply Changes button on the PO detail screen.
Affecting the List
Anytime you update an item, the changes are going to affect the list of items.
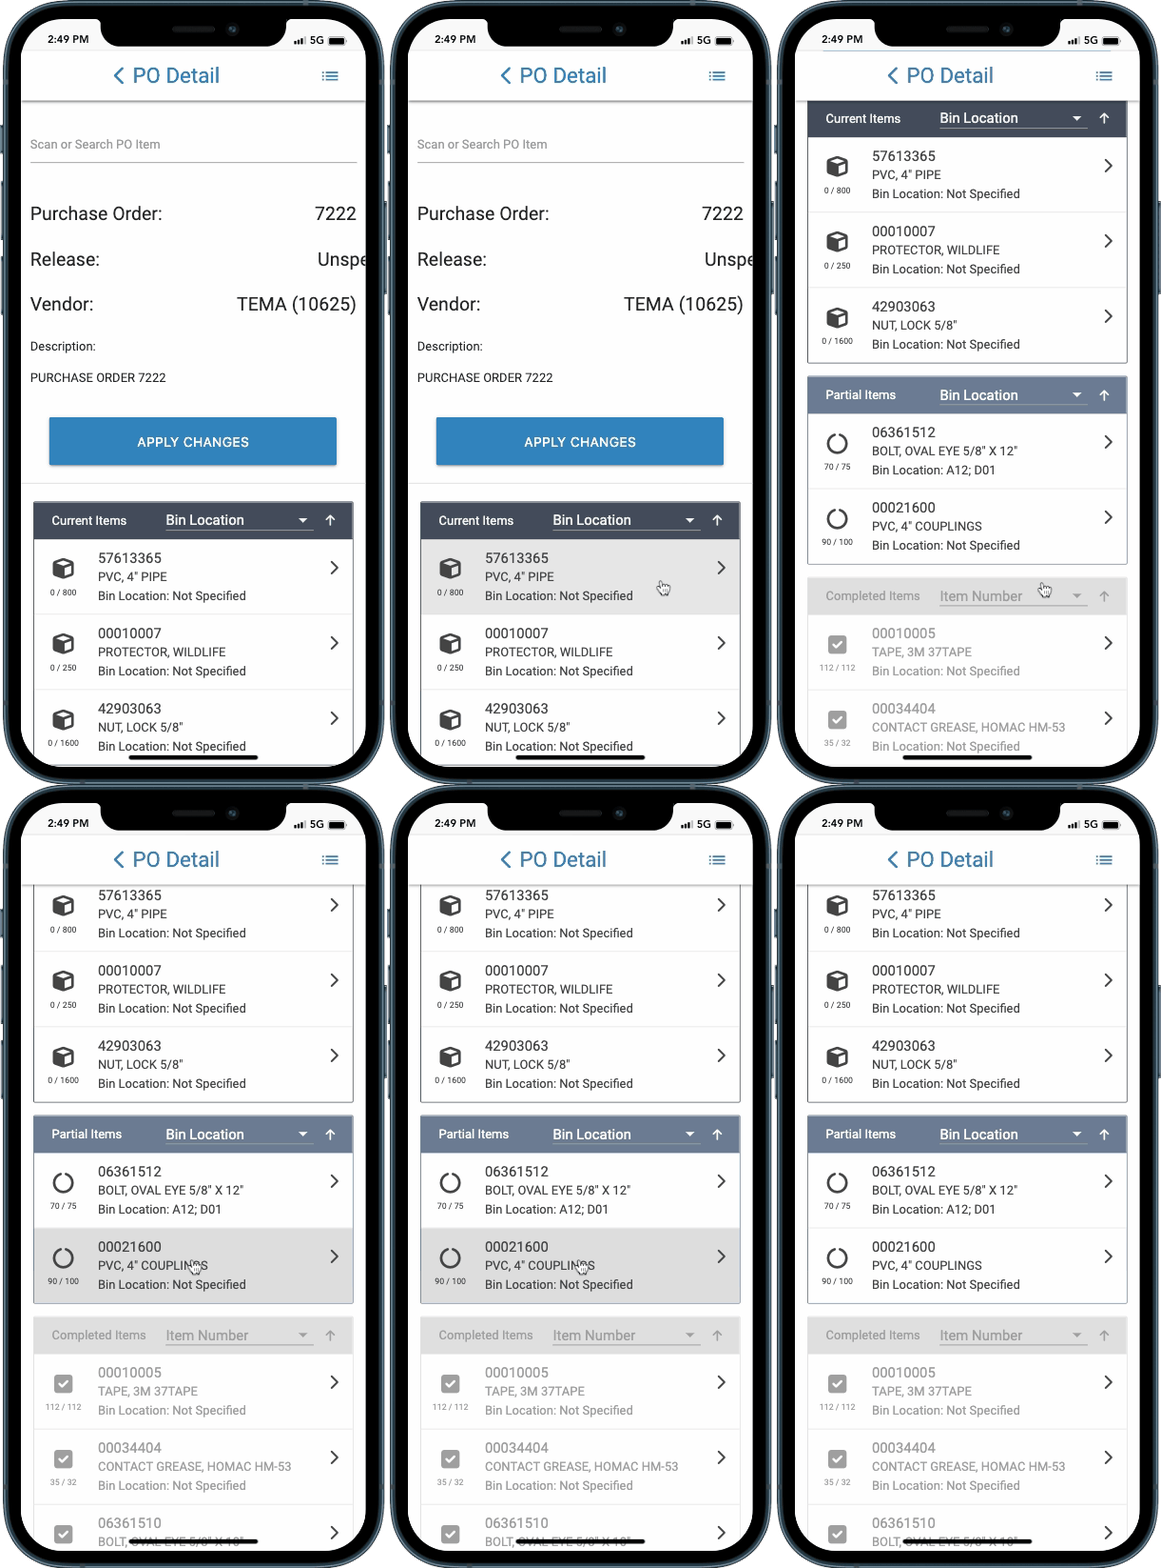
I received part of the ordered quantity of item number 00021600 and we see it’s been moved into the partial items section of our list.
Search: PO By Number
You can quickly find a PO by typing or scanning the PO number into the search field.
PO Detail
This is a dynamic screen displaying all information about this PO that is being pulled from your ERP in real-time via our web service integration.
PO Detail Sections
The list is divided into 3 sections.
Current Items - None of the ordered quantity has been received.
Partial Items - Some of the ordered quantity has been received.
Completed Items - All or more of the ordered quantity has been received.
Each section can be further sorted by bin location, item number, and ascending/descending order.
Search the PO for a Specific Item
Using the field at the top of the PO detail screen, you can type or scan in the part number of a specific item. The list will be narrowed down to just that item.
Notification Flag
Anytime we are making a change to a PO in MOBILETrak, a flag will appear next to the module name or icon to notify us and any other users of the changes being made.
Applying Changes
Even if not all of the material on the PO has made its way into the completed section of the list, we can hit the Apply Changes button.
This button sends your received quantities to your ERP, affecting on hand inventory numbers in real-time.
Note that even if we’ve submitted the received quantities to our ERP, we can still go back into this PO and finish receiving the rest of the quantities at any time by doing a PO search in Receiving Module’s landing screen.
INVENTORY
The INVENTORY Function has its own sub-menu. This menu includes the following transactions:
Material Charge Out (Expense)
Material Return
Material Batch
Inventory Count
Item Inquiry
Material Return
This function is used when someone needs to bring a part back into inventory that has already been expensed.
Material Charge Out
This function is used when someone needs to remove individual parts from inventory outside of a guided work order pick. Items can be charged-out or expensed to a specific work order number or GL account.
Material Batch
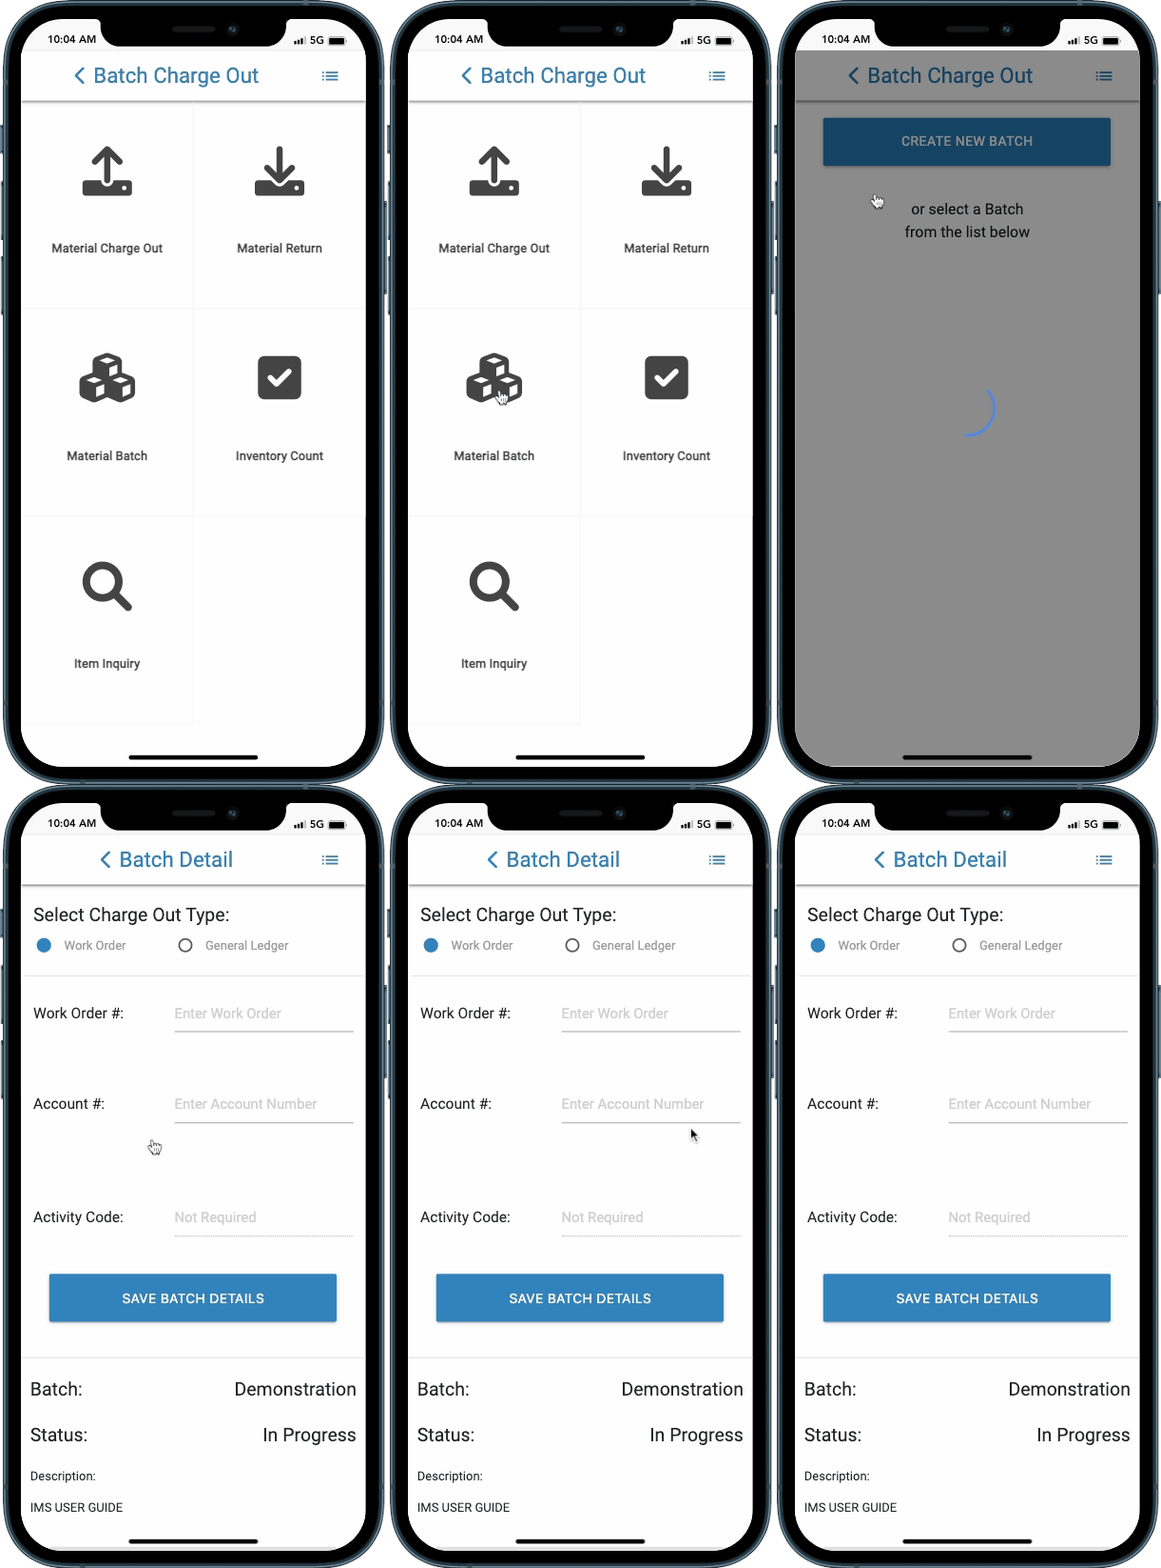
Batch Charge Out
This function is used when someone needs to remove several materials from inventory before a work order or GL account has been provided. It is a way to temporarily capture a group of items that will be taken out of inventory now, but charged out to a work order or GL account at a later time.
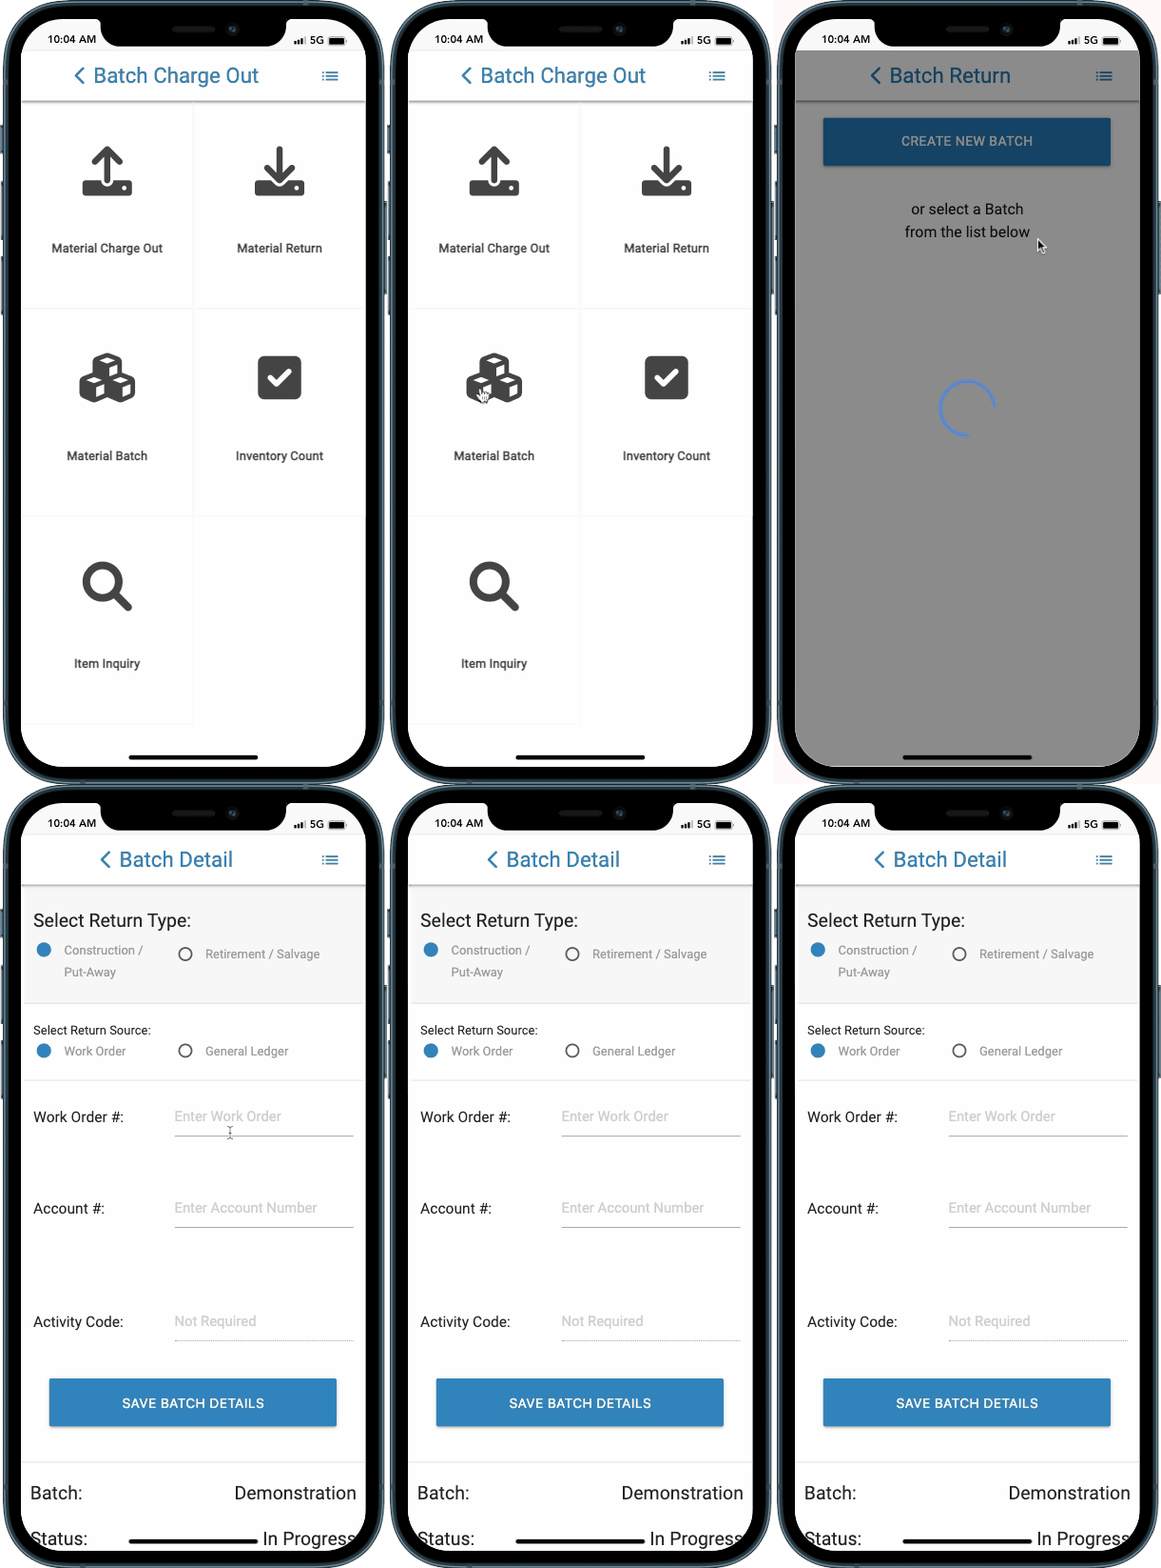
Batch Return
This function is used when someone needs to return several materials to inventory before a work order or GL account has been provided. It is a way to temporarily capture a group of items that will be put back into inventory now, and added back to a work order or GL account at a later time.
Inventory Count
Sub Menu
The Inventory Count Function has its own sub-menu. This menu includes the following transactions:
- Physical Inventory
- Cycle Count
Physical Inventory
This function is used when completing a full warehouse inventory (often annually or bi-annually). Scan each item in your inventory and enter in your quantity on-hand.
Notes:
Scanning an item again may override the value you input the first time, depending on your ERP settings.
The count is by location so individual warehouses will need to count their inventory separately.
Cycle Count
This function is used after a capture has been created in the ERP. Sort your list of items in the capture by bin location, or by item number. Scan each item and enter your on-hand quantity.
Notes:
Applying changes to the ERP more than once for an item may override the value you previously input, depending on your ERP.
The count is by location so individual warehouses will need to count their inventory separately.
The Inventory Count module allows you to consistently review your on-hand inventory, keeping your stock consistent between the ERP and the warehouse.
Item Inquiry
The Item Inquiry allows a user to look up Material Items Detail by either Item Number OR Material Description.
From the INVENTORY Menu, click or tap ITEM INQUIRY
Enter either the Item Number Or Description to view filtered list
Description Search
Item Number Search
Tap on an item to select it from the list and see details for the item
The Item Detail screen gives the user information about the item. From this screen, the user can open and view either ONLY the warehouse they are currently logged into, OR, unlock the ALL Warehouse toggle to see stock in All Warehouses.
NISC Users can also change or add a BIN Location from this screen. To change or add a bin location, unlock the Bin Location toggle and modify. To save changes, tap or click the Save Item button.
TRANSFERS
The TRANSFER Function has its own sub-menu. This menu includes the following transactions:
Item Transfer
Transfer Request
Transfer Issue
Item Transfer
Transfers can be completed immediately for a single-item using the “Item Transfer” function.
Scan or search for an item and select it.
Enter the location you would like to transfer the item to and the quantity you want to transfer. By default the “from” location will be the location the user is currently logged into.
To create a request for transfer of 1 or more items from another location, use the “Transfer Request” function. All transfer requests will be made “to” the location the user is signed into. In order to create a new transfer request the user must click on the “Create New Transfer Request” button, add a description, and choose the location they want to request items from. Once request has been created, click “Add Item to Transfer Request” to begin selecting items and quantities.
In progress transfer requests will appear in the Transfer Requests list under the “Current Transfer Requests” heading.
Once the appropriate items have been added and the request has been submitted the request will move to the “Submitted Transfer Requests” section.
After the transfer has been issued from the requested location the transfer request will appear under the “Completed Transfer Requests” section within the Transfer Requests list.
Transfer Request
If an item is not assigned to the “from” warehouse in the ERP system, the user will see an error indicating the item does not exist in the requested location. Visit the Item Inquiry function to see the current available inventory and locations of an item.
Transfer Issue
Once a transfer request has been created it will appear under the Transfer Issue function in MOBILETrak.
New transfer requests will be flagged in red as “unstarted”
Transfer requests for which at least 1 item has been picked will be flagged in orange as “in progress”.
The Transfer Issue list separates new “unstarted” requests from “in-progress” and “completed” requests as pictured below.
A requested has been “completed” once 1 or more items have been picked and “issue transfer” has been selected to send the data back to the ERP.
Transfer issues behave in a similar manner to the Work Order function. The user can narrow the list by using the search field or work through the list from top to bottom. Lists can be sorted by Bin Location or Item Number and the user can work through an issue list just like they would a work order pick list.
Select the item, enter the quantity being issued, and select “Issue Transfer” in order to complete the transfer to the requesting location.
When there is a need for new material and it’s not available from an existing location, MOBILETrak lets the user submit a request to order that material through the Requisitions function.
Click on “Create New Requisition” to create a requisition, or if one has already been started it will appear under the “Pending Requisitions” area for up to 2 weeks.
Requisitions completed in the last 2 weeks will appear under “Completed Requisitions” in the Requisition list.
REQUISITIONS
When Creating a New Requisition
You must enter a description, select the buyer, and select the requisition type as seen here.
Add items to the requisition and once ready, click “Submit Requisition” to send the request along through the process. Once submitted, the requisition will be routed to the designated contact by email and/or uploaded to the ERP (dependent on ERP requirements for handling requisitions). It will also appear under “Completed Requisitions” in the Requisitions list for 2 weeks.
Print Barcode Label allows a user to create a barcode label for multiple purposes.
Choose your Barcode Type: Item, Work Order, or Generic Barcode.
Choose your label size: Default options are 3x1 and 4x2. Custom label formats are available, just ask your ID Solutions representative.
Select your Printer: This may be a printer on your network or the ID Solutions Print Server if you have one set up.
Enter your data: Depending on the Barcode Type you chose you’ll enter in a part number, work order number, or item value and description. For serialized items you can select the serial number you wish to print.
Choose the quantity of labels you want to print and then select “Print Barcode” to print. Voila!
PRINT BARCODE LABEL
MOBILETrak allows for certain fields to be customized on per device basis. These settings allow a device user to set up a personalized experience depending on business needs. The settings configuration recommended by ID Solutions is pictured below:
WORK ORDER OPTIONS:
Show On-Hand Quantity - Allows the current number of on-hand quantity coming from the ERP to be either seen or hidden by the device user.
Auto-Fill Staked Quantity - Allows the currently staked quantity to automatically appear as the “current quantity” when picking a work-order.
Auto-Next - This setting allows the user to proceed to the next item without returning to the “Work Order Detail” screen when picking items on a work order,
Hide Exempt Items - Optionally hides the Exempt Material Type on the “Item Detail” screen within the Work Orders module.
Hide Special Equipment - Optionally hides the Special Equipment Material Type on the “Item Detail” screen within the Work Orders module.
Hide Item Details - Optionally hides the Material Group and Material Type on the “Item Detail” screen within the Work Orders module.
RECEIVING OPTIONS:
Receive Items In Current Location Only - Allows items that have been assigned to a specific warehouse on the purchase order, to be
Auto-Fill Ordered Quantity - Allows the ordered quantity to automatically appear as the “current quantity” when receiving items on a purchase order.
Hide Item Details - Hides less relevant item details from view for enhanced efficiency on smaller devices.
INVENTORY OPTIONS:
Display Default GL Account - Allows display of a chosen default GL account for material Charge-outs and Returns (to set default accounts contact IDS)
Enable Division - Allows a Division/Project to be entered.
Enable Department - Allows a Department to be entered.
Enable Activity Code - Allows an Activity Code/Task to be entered.
Edit Activity Code Only When Required - Advises the user if an Activity Code/Task is required.
Show On-Hand Quantity - Shows the user the current on-hand quantity in the ERP when charging out or returning items to stock
Retain Notes -Will retain the data the user has input into the notes field during the charge-out or return process for the duration of that user’s session.
Excess Work Order Return Warning - Will turn on a warning message that appears to a user during the Material Return process which warns if the quantity being returned does not match the quantity originally charged out for the specified Work Order.
Count Variance Warning - Warns the user when the item quantity saved does not match the ERP system’s on-hand quantity for that item.
Cumulative Counts - This allows the users to input more than 1 quantity for items within the Physical Inventory and Cycle Count modules.
SEARCH INFORMATION:
Extended Search - This allows the user to search for items that contain the characters (numbers or letters) searched rather than requiring an exact match for the item number.
Description Search - This allows the user to find items based on words in the item description.
ADDITIONAL OPTIONS:
Validate Barcode - This requires the user to validate the item number or barcode before submitting any changes to an item.
Barcode User In Description - For some ERP’s this appends the barcode user’s information to the description sent back when a transaction is submitted to the ERP.
Barcode Transaction In Description - For some ERP’s this appends the transaction information to the description sent back when a transaction is submitted to the ERP.
Show Current (Physical/Cycle) Count - This shows the user the current on-hand inventory for items within a count.
Warn On Negative Quantity - This shows a warning to the user whenever completing a transaction would cause the count to go below zero.
Split Serials on Delimiters - This allows a 2D barcode with multiple serial numbers (delimited by a space, a line break, a comma, or semi-colon) to be scanned into the serial number field within the Cycle Count module.
SETTINGS
The “About” page contains contact information including ID Solutions physical address and our phone number.
The page also contains information about which version of MOBILETrak you’re currently running. MOBILETrak is frequently updated with new feature improvements. See what features have been most recently updated on our NEWS page.
ABOUT
Clicking on the “Help Desk” link will open a new tab in your browser that takes you to our help desk, located at: https://helpdesk.accessids.com/_hd_login.php From here you can log-in to an existing account or register as a new user.
Contact your ID Solutions representative for assistance.
HELP DESK


